
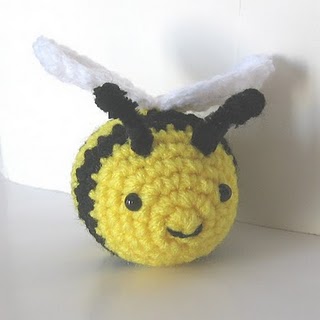
My sons asked me to make them a bee so here is what I came up with:
Materials:
- Crochet hook E4 / 3.5 mm
- Worsted weight acrylic yarn in yellow, black and white
- Polyester fiberfill
- 6mm black safety eyes
- Yarn needle
- Sewing needle
- Black pipe cleaner
 Bee:
Bee:With yellow yarn
Rnd 1: 6 sc into a double loop start and pull the loop closed (6).
Rnd 2: 2 sc in each sc around (12).
Rnd 3: [Sc in next 3 sc, 2 sc in next sc] 3 times (15).
Rnd 4: [Sc in next 4 sc, 2 sc in next sc] 3 times (18).
Rnd 5: [Sc in next 5 sc, 2 sc in next sc] 3 times (21).
Rnd 6: [Sc in next 6 sc, 2 sc in next sc] 3 times (24).
Switch to black yarn
Rnds 7-8: sc in each sc around (24).
Pause to attach eyes between Rnds 3 and 4.
Using a length of black yarn split down to 2 ply and a sewing needle, stitch mouth onto Rnd 1.
To make antennea, cut a black pipe cleaner in half. Cut a length of black yarn and tie and knot it around the center of a piece of black pipe cleaner a few times. This will create a little ball at the tip of the antennea. Bend the pipe cleaner in half and insert the ends into the bee's head between Rnds 5 and 6. Leave about 1"-1.5" of the antennea sticking out of the bee's head. With the pipe cleaner that is inside the bee's body, bend the two pieces at a 90 degree angle to anchor the antennea in place. For added strength, you may want to stitch the pipe cleaner "tails" to the bee's body using a length of yellow yarn. Repeat with other half of the pipe cleaner for the other antennea.
Switch to yellow yarn
Rnds 9-10: sc in each sc around (24).
Switch to black yarn
Rnd 11: sc in each sc around (24).
Rnd 12: [sc in next 2 sc, sc2tog] 6 times (18).
Switch to yellow yarn
Rnd 13: sc in each sc around (18). Stuff.
Rnd 14: [sc in next sc, sc2tog] 6 times (12).
Switch to black yarn
Rnd 15: [sc in next 2 sc, sc2tog] 3 times (9).
Rnd 16: [sc in next sc, sc2tog] 3 times (6).
Finish off leaving a 6" tail. Weave tail through remaining 6 sc and pull up firmly to close the hole. Weave in ends.
 Wings:
With white yarn
Rnd 1: 6 sc into an adjustable ring and pull the ring closed.
Rnd 2: 2 sc in next sc, 2 hdc in next sc, 2dc in next 2 sc, 2 hdc in next sc, 2 sc in next sc (12).
Rnd 3: [sc in next st, 2 sc in next st] 2 times, hdc in next st, 2 dc in next st, dc in next st, dc and hdc in next st, [sc in next st, 2 sc in next st] 2 times (18).
Finish off leaving a tail for sewing. Sew wings to bee. Weave in ends.
9 comments:
Very cute!
cool bee...good design :)
How big is this bee? Or did I totally miss it in there? I love the pattern. Too cute!
Hi, Melissa! I haven't measured it but I'd say about 2" in diamter and 2.5" long.
Hi there! I'm a beginner when it comes to crochet so forgive the dumb questions. I haven't yet come across a pattern that started off this way. 6 sc into a double loop start. Can you tell me how to do this in crochet for dummy speak?
Thanks!!
Hi! That is not a dumb question at all. It is sometimes called a magic ring, an adjustable ring or a magic adjustable ring. If you google those terms you will find tutorials and videos that show you how to do it.
Are you working in a spiel or do you sl st at the end of each rnd?
This pattern is worked in a spiral of continuous rounds.
I loved this so much that I took it to put on my blog. Don't worry, with the pattern I wrote your blog site and said how much I loved your blog and I wrote that if people want to get more cool patterns to go to your blog. If you have problems with this. Like you don't want your patterns on my blog then please I would love it if you go to my blog (http://young-crafter-at-crafters-paradise.blogspot.com)and post a comment about what you think. I am sorry if reading this is getting you upset at me if so just go to my blog, post a comment telling me to take it off.
Post a Comment